
Question #4 - The Spacer - Deep Dive
One of the least understood "add-ons" for a custom jig is the spacer or opting to have the jig cut such that the back of the jig acts as a stop against the shoulder of the keg. Let's delve into that a little deeper, and maybe add a picture.
The point of the spacer in most folks minds is, "it makes it easy - just drop the keg in the jig and tighten it down and its 'perfect'". This is ONLY TRUE IF you have one consistent dimension: The distance from the face of the shoulder to the tip of the tone channel is accurate and repeatable. ANY variation between the tip of the tone channel and the face of the shoulder is going to be misalignment of the keg in the jig in relation to the tone channel (which is excruciatingly important).
I contend that the above is only true if you are extremely consistent with your hand turning (I have met very few that are willing or capable to produce that kind of accuracy) or are using CNC cut kegs. - and likely the use of a spacer for the average person that is not paying particular attention to this relationship, causes more variation and poor results on calls made using the "locate off the back of the jig" method. If one can not maintain that consistency - one is much better of devising some sort of locating device that references the tip of the tone channel and some part of the jig - this way all the other details are irrelevant, at least in terms of location of the tone channel in jig.
How you choose to locate the keg in the jig is up to you. We just want to be sure you understand that the variables that control the outcome reside in your shop and making sure the tip of the tone channel is in the right place.
Another misconception of the spacer, is that it keeps your o-ring groove out from under the set screw. That is only true, if comparing to having the jig cut with the tone board located farther away from the back of the jig to "eliminate the need for a spacer" -AND- your groove location would fall in the area of the set screw. Take a look at the image below, that may help make it make sense. The top image is using the spacer (blue lines) method, the red lines indicate the area where the o-ring groove would be contacted by the set screw in the jig (white lines). The bottom image is using the back of the jig for locating and NOT using a spacer. Notice the set screw does not move, and the area where the o-ring groove can NOT be is much larger.
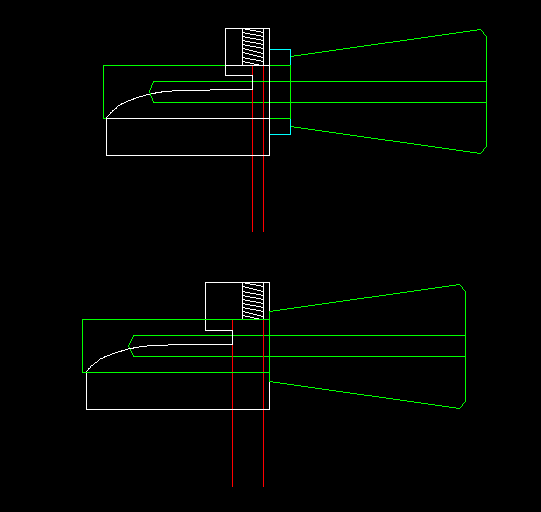
The set screw location in the jig is "set in steel" - meaning, the tapped hole is put in when the blanks are prepped for heat treatment. To keep costs down, we prep all the blanks with a standard bore, set screw location, and engraving prior to heat treat. Its cheaper and easier to machine soft metal than it is to machine hardened metal. Once they are all prepped, they go to heat treating as a batch. This saves even more cost as there is a "batch fee" for heat treating on top of a per pound charge. One jig blank or 200 have the same batch fee ($300 batch fee and $3.35 per pound - as of Nov 2026). Heat treating ONE blank is about $306.00 plus shipping to and from the heat treater. That is why we dont "move" the set screw on our blanks, and a custom set screw location has to be planned ahead and the blank prepped when we do our yearly batch of blanks - or one has to be willing to pay a bunch more for the prep of a single blank, and the notable cost of heat treating. We chose our blank design specifically because it allows for the largest coverage of variables with the least amount of added cost.
Hopefully this helps explain it a bit better and allows you to visualize things if you are unfamiliar so that you can make the best decision for your situation.
Other related articles

Custom Jig Questions Explained...
2024-03-28 20:33:37
Ahh good! More info about those jig questions!